While do-it-yourself projects can be fun and fulfilling, there is always a potential for personal injury or property damage. We strongly suggest that any project beyond your abilities be left to licensed professionals such as electricians, plumbers, and carpenters. Any action you take upon the information on this website is strictly at your own risk, and we assume no responsibility or liability for the contents of this article.
How to Change or Rotate Your Tires

Whether you recently got back from a long road trip, or you simply realize your tires have been neglected for a while, changing or rotating your own tires will keep your vehicle safe and ready for the road ahead.
Changing your tires helps make sure you replace existing tires that are worn beyond use. A few signs that it is time to change your tires include the following:
- Your tires are bald with little to no tread left
- The sidewalls of your tires are damaged
- You can see your tire’s wear bar — a built-in rubber bar that indicates when your tires are worn beyond use
Conversely, if your tires have more life left in them, but they are starting to wear unevenly, it might be time to rotate your tires.
Whether you are swapping out your old tires for new ones or are simply rotating existing tires, the following tips will help you safely navigate the process of taking off and putting on your tires.
Tools You Need
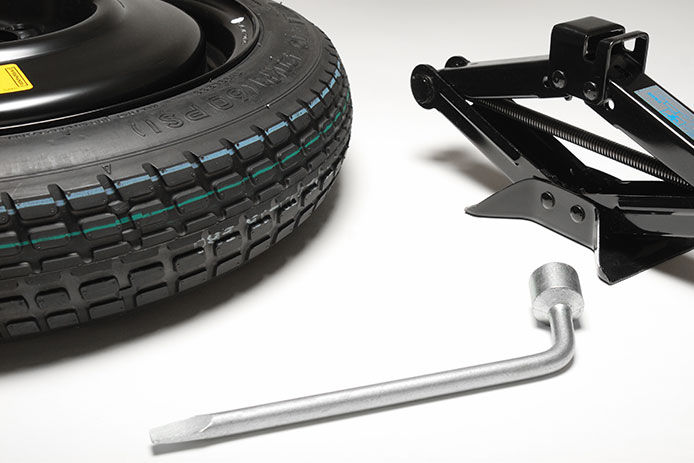
Before you tackle any DIY project, you first need to ensure you have all the right tools on hand. For changing tires, you won’t need many items. The following will help ensure the process goes smoothly and safely:
- A lug wrench or impact wrench
- A jack
- Jack stands
In many cases, your vehicle will come with these tools already. However, upgrading to a nicer jack with multiple heavy-duty stands can help make the process safer. Additionally, switching from your vehicle’s lug wrench to using an impact wrench can speed up the process of removing tires.
Once you have all the necessary tools, you can get to work changing your tires.
Changing out Your Tires

Changing your tires is a fairly easy process. Simply follow the steps below.
- Start by loosening your lug nuts while your car is on the ground. If you jack up your car and then try to loosen your tires’ lug nuts, it will be nearly impossible. By starting with your vehicle on the ground, you can use the tension created by the weight of your vehicle to break the nuts loose.
- Once your lug nuts are loosened a little bit, jack up your car. Depending on how many jacks you have, you might need to work on one tire at a time, or you might be able to remove multiple tires at once.
- With your car safely jacked up, finish loosening all the lug nuts on your tire.
- Once the nuts are fully removed, you can pull the tire away from the vehicle.
- After removing the old tire, slide the new tire into place. Make sure that if you purchased directional tires, you are putting the tires on with the tread facing the correct direction.
- With the new tire in place, retighten the lug nuts. Start by tightening them by hand. Once you have them hand tight, lower your vehicle again.
- With the vehicle back on the ground, you can finish tightening the lug nuts with either your lug wrench or your impact wrench. Be sure to tighten the nuts in a star pattern. By tightening each nut a little at a time in a diagonal pattern, you can ensure even tightening. If you work in a circle, you can wind up over-tightening the lug nuts, leading to damage.
Rotating Existing Tires

The process of rotating your existing tires is nearly identical to the process of changing out your tires. The only major difference is that, instead of placing a new tire on after removing an old one, you will need to swap your tires in a pattern.
The pattern you use will depend on the type of tires you have and whether or not your vehicle is front or rear-wheel drive.
Directional tires are designed with tread that can only face one direction. Look on the sidewall of your tires. If you have directional tires, a little arrow or triangle will indicate the direction the tire should turn. In the case of directional tires, you can only rotate your left front to the left rear and your right front to the right rear. This ensures the tread is still pointing the same direction after rotation.
If you do not have directional tires, you can rotate them based on whether or not you have a front or rear-wheel drive. For front-wheel-drive cars, move the front tires straight to the back of the vehicle, left front to left rear and right front to right rear. Then, take the back tires and rotate them to the opposite front sides. The left rear tire becomes the front right tire and the right rear tire becomes the left front. In the case of a rear-wheel-drive vehicle, reverse the pattern, moving the front tires to opposite rear locations and move the rear tires straight forward.
Safety Zone

As is the case with any DIY project, make sure you always put safety first when changing out tires.
Never Work Alone
If at all possible, never change your tires alone. Jacking up a vehicle comes with inherent risk. It is better to work with another person, just in case something goes wrong.
Work in a Safe Place
Ideally, you should change tires on a flat, even surface away from traffic. If possible, utilize a dedicated driveway or garage.
Use the Right Tools
Using the right tools is the key to safety in any job. Make sure that the lug wrench or impact wrench you use is the proper size. Always ensure that your jack and jack stands are designed for the weight of your vehicle. This is imperative to your safety. It is better to hold off on the project until you have the right tools on hand than to make do with ill-sized tools.
Changing out or rotating your tires can be a useful skill to have as you strive to keep your vehicles in tip-top shape. With the right tools, a little sweat, and a bit of your time, you can keep your wheels spinning for the miles ahead.

